Oboe Adjustment Guide

Concepts
1. The principal key (the ones you put your fingers on, usually further down the instrument) should always feel slightly heavier (more drag) than the secondary key (which is worked indirectly, usually further up the instrument) with the cigarette paper test.
2. The adjustment screw has a direct effect on the secondary key; more specifically, if you turn the screw to the right, it will make the secondary key heavier and, vice versa, if you turn it to the left.
3. When turning the adjustment screw, always turn the screw one minute at a time, and then proceed to check with the cigarette paper. Make an exception only when you can see/feel that the key is gaping open.
4. When pressing down a key to check the principal/secondary key relationship, always use the same amount of pressure as when you are playing; that is, use the lightest amount of pressure possible to make the key pad completely seal the tone hole.
5. The order is important! As a rule of thumb, start at the top and progress down the Oboe.
6. The bridge keys under the right Ab must be lined up with the arm that comes up from the F# key. Don’t split the difference between sides.
7. Joints must not wobble (tenon cork must fit tightly)
8. Skin pads will not grab the paper in the same way as cork pads. (less drag)
All the keys that need to be shut when the instrument is at rest need strong enough spring action so they will remain in a closed position. I.e. Forked “F” resonance key!
Adjustment Guide, Follow this order

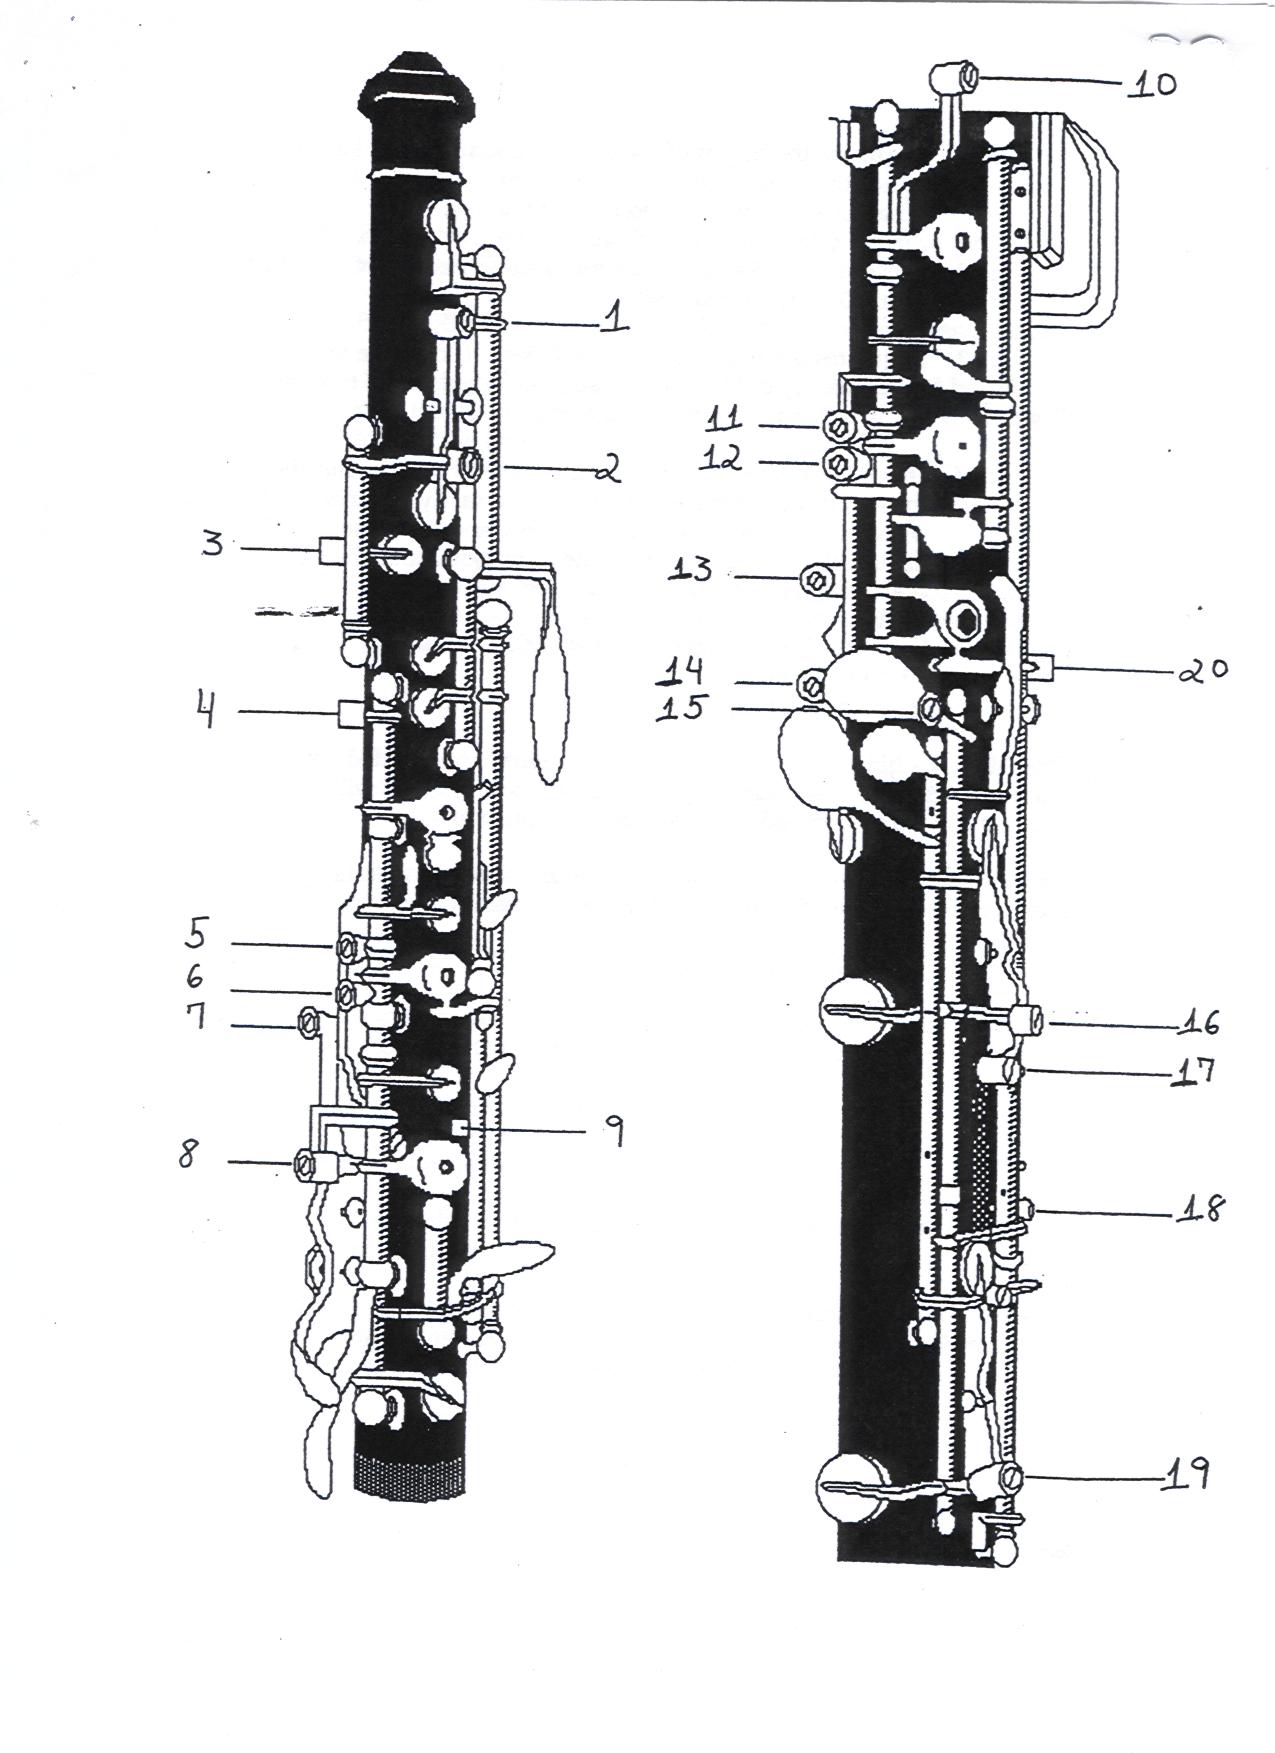
1. Screw #7: Regulates the amount of ‘play’ in the F# key. There must be some ‘play’ between the F# key and the bridge key. Turning screw #7 clockwise will increase the amount of the space. Also make sure there is lost motion between the upper and middle joints on the C-D trill side, if there is no space, sand the corks.
2. Screw #6: Regulates the balance between the C vent and the Bb vent. If those two keys are not properly balanced, the A and B will be affected.
3. Screw #5: Regulate A key with C vent.
4. Screw #8: Regulates the G key and the Bb vent.
5. Screw #10: Regulates the connection between G# and F# keys. Do not over adjust!
6. Screw #14: Regulates E key with F resonance key. F resonance key should not be too tight.
Remember!
a. Turn screw #14 counterclockwise a little, to properly adjust the E to forked F.
b. Adjust E to vent key (forked F) with #11.
c. Adjust D to vent key (forked F) with #12.
d. Add in F resonance key with #14.
a. Turn screw #14 counterclockwise a little, to properly adjust the E to forked F.
b. Adjust E to vent key (forked F) with #11.
c. Adjust D to vent key (forked F) with #12.
d. Add in F resonance key with #14.
7. Screw #11: Regulates E key and vent key (forked F).
8. Screw #12: Connects D key to vent key (forked F) – Do not over adjust screw #12!
9. Screw #15: Regulates high C# and high D. They should close the E key when low C key is down.
10. Screw #13: Regulates the height of the low D key. Clockwise will lower the D key, but by doing so, it will sometimes correct a too bright or slightly sharp E.
11. Screw #16: Regulates left hand Eb going to low C. You should be able to play Low C and press the left hand Eb key without changing the tone of the low C.
12. Screw #17: This is the contact point between the left hand Eb and the large spring. It must have some space! It is rarely adjusted. If it is left without any space between the screw and the spring, it will disturb the linkage between the lower joint and the bell, or leave the Eb key open.
13. Screw #19: Works just like screw #16. Play low B with C# key down. Do not over adjust screw #19.
14. Bell Screw: Regulates the amount of ‘play’ between the bell adjusting screw and the lever that connects the bell to the middle joint. Turning the bell screw clockwise will reduce the amount of play—some lost motion is necessary. Not all Oboes have this screw.
15. Screw #18: Regulates the balance between low B and Bb. The two keys should be equal. If screw 18 is turned clockwise, it will give more tension to the Bb key. -Test by playing low C to low Bb, it should be clean and smooth. -When depressing the low Bb, the pads of low B and low Bb should touch the tone holes simultaneously, but the ultimate adjustment should be done by playing low C, D, and Bb.
16. Screw #1: Clockwise decreases the amount of opening of both octave keys. It connects the two octave keys.
17. Screw #2: Regulates the opening of the thumb key.
18. Screw #3: Regulates the opening of the third octave.
19. Screw #4: Half-hole opening. The height of this key changes the pitch of the high C#.
20. Screw #9: Regulates the height of the A key. Usually the A key is a bit higher than the G key. The little arm over the A key should close the A key when pressing the G# key.
21. Screw #20: Regulates how much the Eb key will open when played with a left hand lever.
Note: All this adjusting is only possible when all pads are seated correctly and there is enough room between the keys for adjusting. Some new instruments will come lacking the extra space needed for fine adjustment.
When changing pads, it is important to have the new pad matching the others, so the space needed for adjusting will remain.

Discernibly Better Oboes
for Sale and Upon Repair.

Carlos is an oboe and English horn master and he’s here for you. He specializes in selling noticeably better oboes and English horns and helping his clients find the best instrument for them.
By Phone: (214) 383-9734
Contact Carlos
to speak with someone who truly knows a Lorée Oboe – for guidance, advice, and more information.
By Email
[email protected]

