Oboe Adjustment Guide
How Do I Adjust My Oboe?
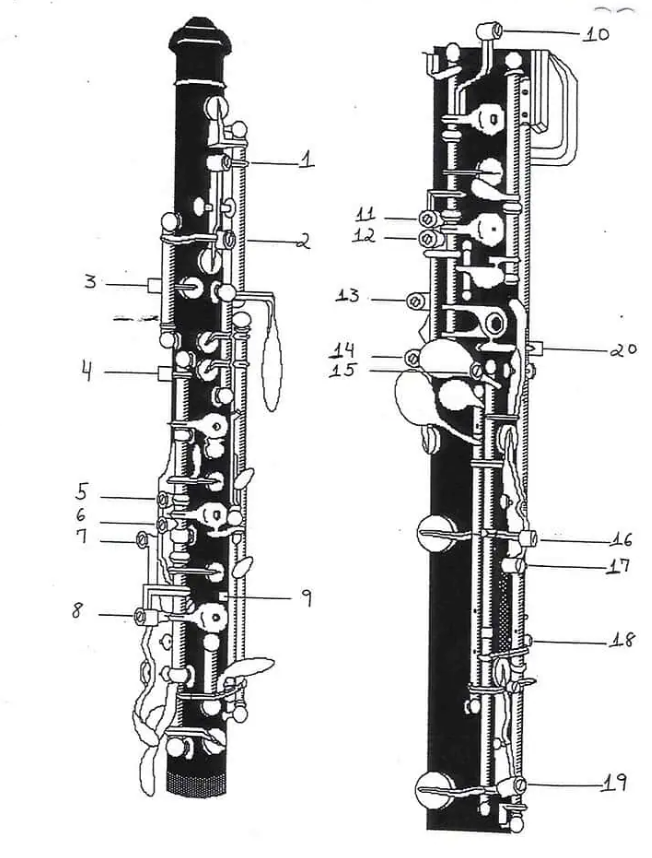
Adjusting your oboe is the process of ‘regulating’ the connected keys (using a series of numbered adjustment screws) so that each key opens and closes with the correct amount of “play” relative to the others. Carlos Coelho, one of two Lorée factory-trained technicians in the United States, outlines the core adjustment principles and screw-by-screw regulation points below.
If you are not comfortable making these adjustments yourself, Carlos can walk you through it, or handle the adjustment directly.
General Principles Before You Start
Before you adjust any individual screw, remember:
- The principal key (the one your finger presses directly) should always feel slightly heavier – more drag– than the secondary key (worked indirectly) when tested with a strip of cigarette paper.
- Turning an adjustment screw to the right typically increases drag on the secondary key; turning it to the left generally decreases it.
- Adjust in small increments. One minute of a turn at a time, checking with the cigarette paper test after each change, unless a key is visibly gaping open.
- Use the same light pressure you’d use in normal playing when checking your key relationships. Use just enough pressure to seal the pad against the tone hole.
- Work from the top of the instrument to the bottom.
- The bridge keys under the right Ab must line up with the arm from the F# key (don’t split the difference!)
- Joints should never wobble, your tenon corks must fit tightly.
- Skin pads grip the cigarette paper differently (less drag) than cork pads.
- Every key that should be closed ‘at rest’ (example: forked F resonance key) needs strong enough spring tension to stay closed.
Screw-by-Screw Adjustment Reference
- Screw #7: Regulates the amount of ‘play’ in the F# key. There must be some ‘play’ between the F# key and the bridge key. Turning screw #7 clockwise will increase the amount of the space. Also make sure there is lost motion between the upper and middle joints on the C-D trill side, if there is no space, sand the corks.
- Screw #6: Regulates the balance between the C vent and the Bb vent. If those two keys are not properly balanced, the A and B will be affected.
- Screw #5: Regulate A key with C vent.
- Screw #8: Regulates the G key and the Bb vent.
- Screw #10: Regulates the connection between G# and F# keys. Do not over adjust!
- Screw #14: Regulates E key with F resonance key. F resonance key should not be too tight.
Remember!- Turn screw #14 counterclockwise a little to properly adjust the E to forked F.
- Adjust E to vent key (forked F) with #11.
- Adjust D to vent key (forked F) with #12.
- Add in F resonance key with #14.
- Screw #11: Regulates E key and vent key (forked F).
- Screw #12: Connects D key to vent key (forked F) – Do not over adjust screw #12!
- Screw #15: Regulates high C# and high D. They should close the E key when low C key is down.
- Screw #13: Regulates the height of the low D key. Clockwise will lower the D key, but by doing so, it will sometimes correct a too bright or slightly sharp E.
- Screw #16: Regulates left hand Eb going to low C. You should be able to play Low C and press the left hand Eb key without changing the tone of the low C.
- Screw #17: This is the contact point between the left hand Eb and the large spring. It must have some space! It is rarely adjusted. If it is left without any space between the screw and the spring, it will disturb the linkage between the lower joint and the bell, or leave the Eb key open.
- Screw #19: Works just like screw #16. Play low B with C# key down. Do not over adjust screw #19.
- Bell Screw: Regulates the amount of ‘play’ between the bell adjusting screw and the lever that connects the bell to the middle joint. Turning the bell screw clockwise will reduce the amount of play—some lost motion is necessary. Not all Oboes have this screw.
- Screw #18: Regulates the balance between low B and Bb. The two keys should be equal. If screw 18 is turned clockwise, it will give more tension to the Bb key. -Test by playing low C to low Bb, it should be clean and smooth. -When depressing the low Bb, the pads of low B and low Bb should touch the tone holes simultaneously, but the ultimate adjustment should be done by playing low C, D, and Bb.
- Screw #1: Clockwise decreases the amount of opening of both octave keys. It connects the two octave keys.
- Screw #2: Regulates the opening of the thumb key.
- Screw #3: Regulates the opening of the third octave.
- Screw #4: Half-hole opening. The height of this key changes the pitch of the high C#.
- Screw #9: Regulates the height of the A key. Usually the A key is a bit higher than the G key. The little arm over the A key should close the A key when pressing the G# key.
- Screw #20: Regulates how much the Eb key will open when played with a left hand lever.
How Many Keys Does an Oboe Have?
[Carlos: this is a section where we need some info from you on how many keys conservatory has versus other options – this is useful content to enrich this page for SEO/AEO]
How Do I Adjust for Tuning or Flatness?
[Carlos: another section that can enrich this, if applicable.]